New episode: Master Your Lens Podcast. How to land your first photography job.
Read MoreCES 2018 and How To Land Your First Photography Job
in podcast, Photography

portrait photography
New episode: Master Your Lens Podcast. How to land your first photography job.
Read More
The Step-by-Step Way To Create Amazing Pictures
Sometimes it's necessary to repeat valuable information. I've received a lot of comments on this post so I thought I'd update it a bit and share it again.
Sometimes, taking the first step is the most difficult one to take when it comes to getting started in photography. Here are seven steps to help guide you through your journey in creating amazing pictures.
Step 1: The Idea
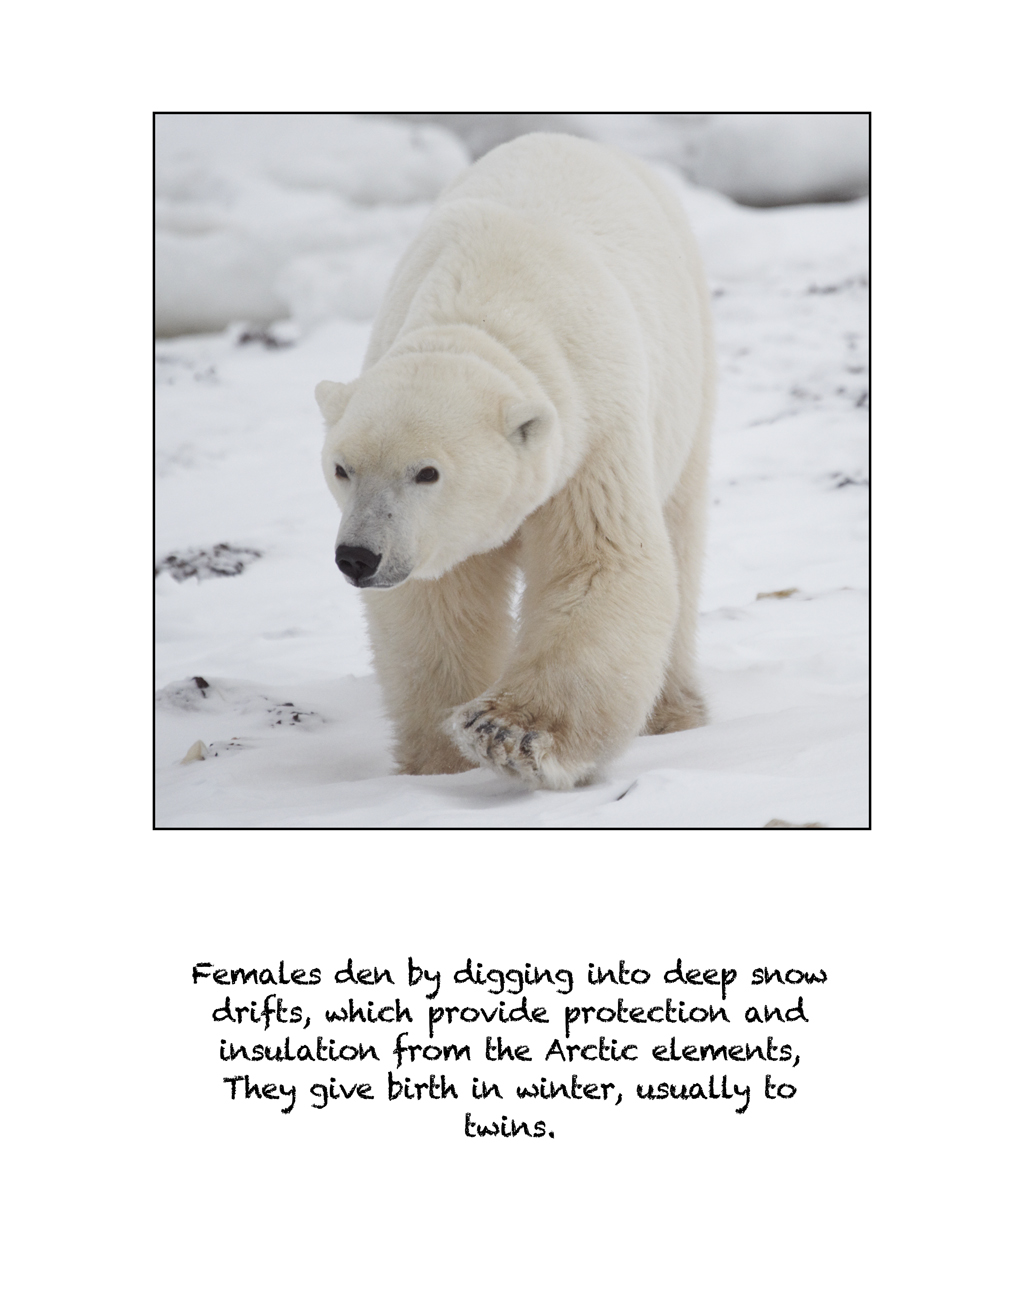
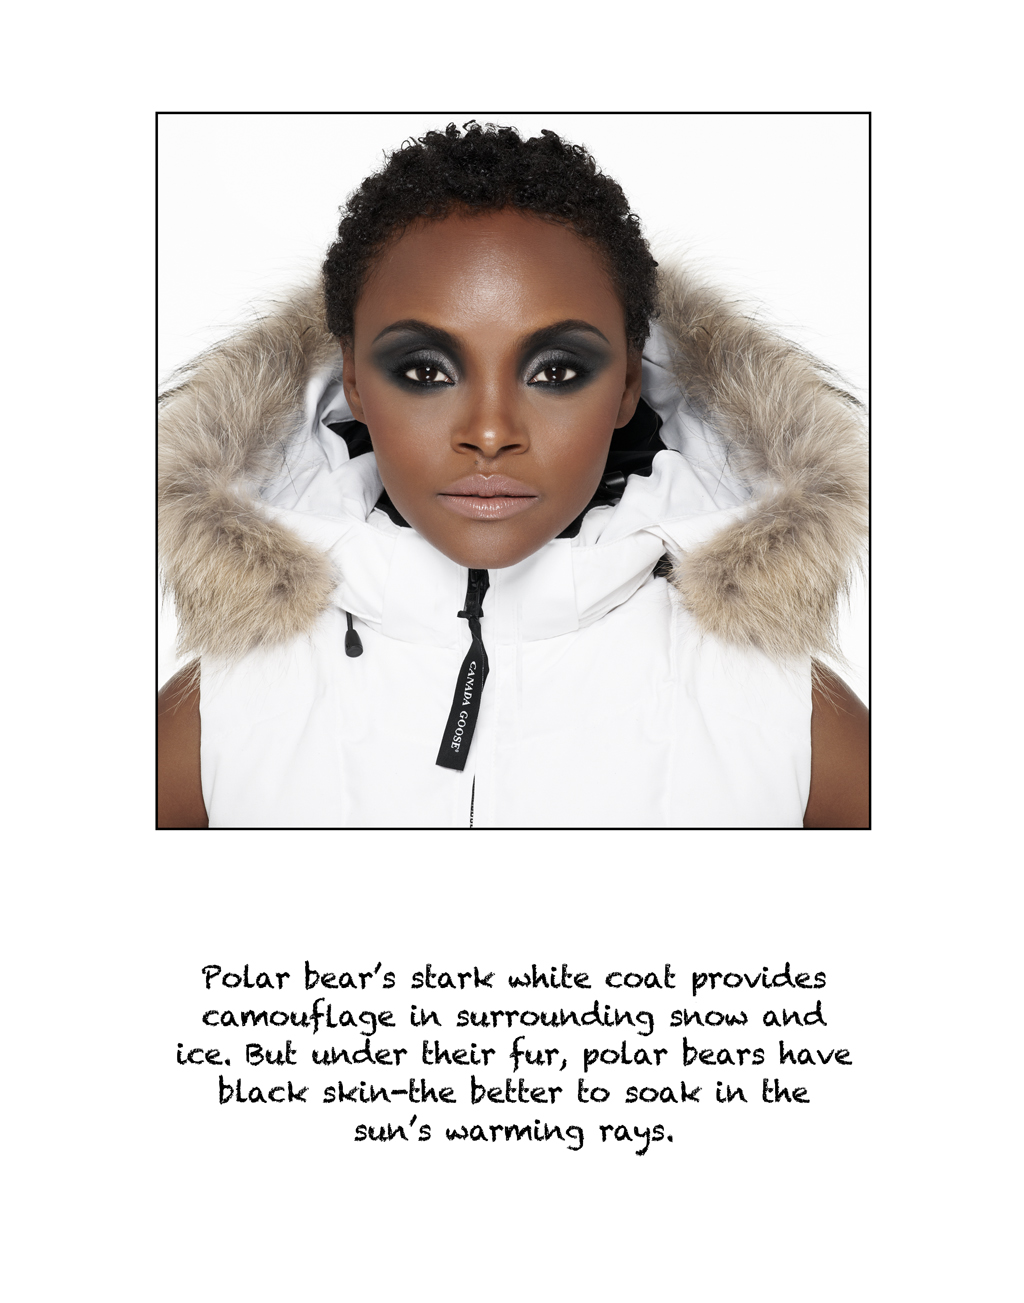
Everything starts with a big idea. As soon as the idea comes write it down right away. Computers and other devices are great, but I prefer putting pen to paper. Maybe I'm old fashion but this seems to work the best for me. Give it a try and see how it works for you. Start with the idea and define it by writing it down. For example, while photographing polar bears in Cape Churchill, I had the idea of photographing models in a way where I could use the images together. While on the trip, I wrote down my idea and by the time I was back in Los Angeles, I had the story together. Putting pen to paaper always helps you define your ideas.
Step 2: Research
Today, it's easier than ever before to do research. I used to keep countless books of tear sheets from old magazines as research material, but today, we have Pinterest to make our lives easier Use Pinterest to make inspirations boards and to conduct your research. After you write down your idea, dive into research. The research helped pull the idea together in a stronger way resulting in the bi-polar beauty story.
Step 3: The Sketch
I'm no Picasso, but I am a visual person. Sketching out my ideas after doing the research has always helped me in visualizing how I will bring my vision to life. In advertising assignments, one of the first things clients send sketches or some type of visual board. The sketch helps you see things in a clear way and visualize the image for the first time in a tangible manner. It also helps me when you need to share your idea with your team. I can share an idea with my team, but they may have a different visual in their mind. When I show and tell it helps my team come together as a unit to bring the vision to life.
Step 4: Pre-Production
Pre-production is probably the most important aspects of any photo shoot, and the bigger the shoot, the more important pre-production is. Whenever I mention this in a seminar or workshop someone always says "what is pre-production?" Pre-production is the process of producing your photo shoot or putting the shot together. You have your idea, you've done your research, you have a sketch and now it's time to figure out all the elements come together to make your shoot a success. The big elements are easy to see, but it's the small details that can often become overlooked and make or break a photo shoot. Pre-production is the key to having a fantastic shoot, so make sure you go over every element and mentally walk through the steps to bring your vision to life. The more time you spend producing, the better things will be on your shoot day. If you're shooting a model, what color will her nails be? If you're shooting on a beach, how will you change lenses if it's windy? Try to think of every small detail you can and plan for your success. A key element to always have is a call sheet. No matter how big or small this will keep you from going crazy when you move to the next step.
Step 5: Taking Your Picture
This is the fun part, which is why so many people want to start here, but if you skip the steps before this and jump into taking a picture you will find yourself in the same place year after year. Great pictures are rarely a mistake. Yes, there are those times when something amazing takes place right in front of your camera, but it happens more often to the photographer who is trained to create great images.
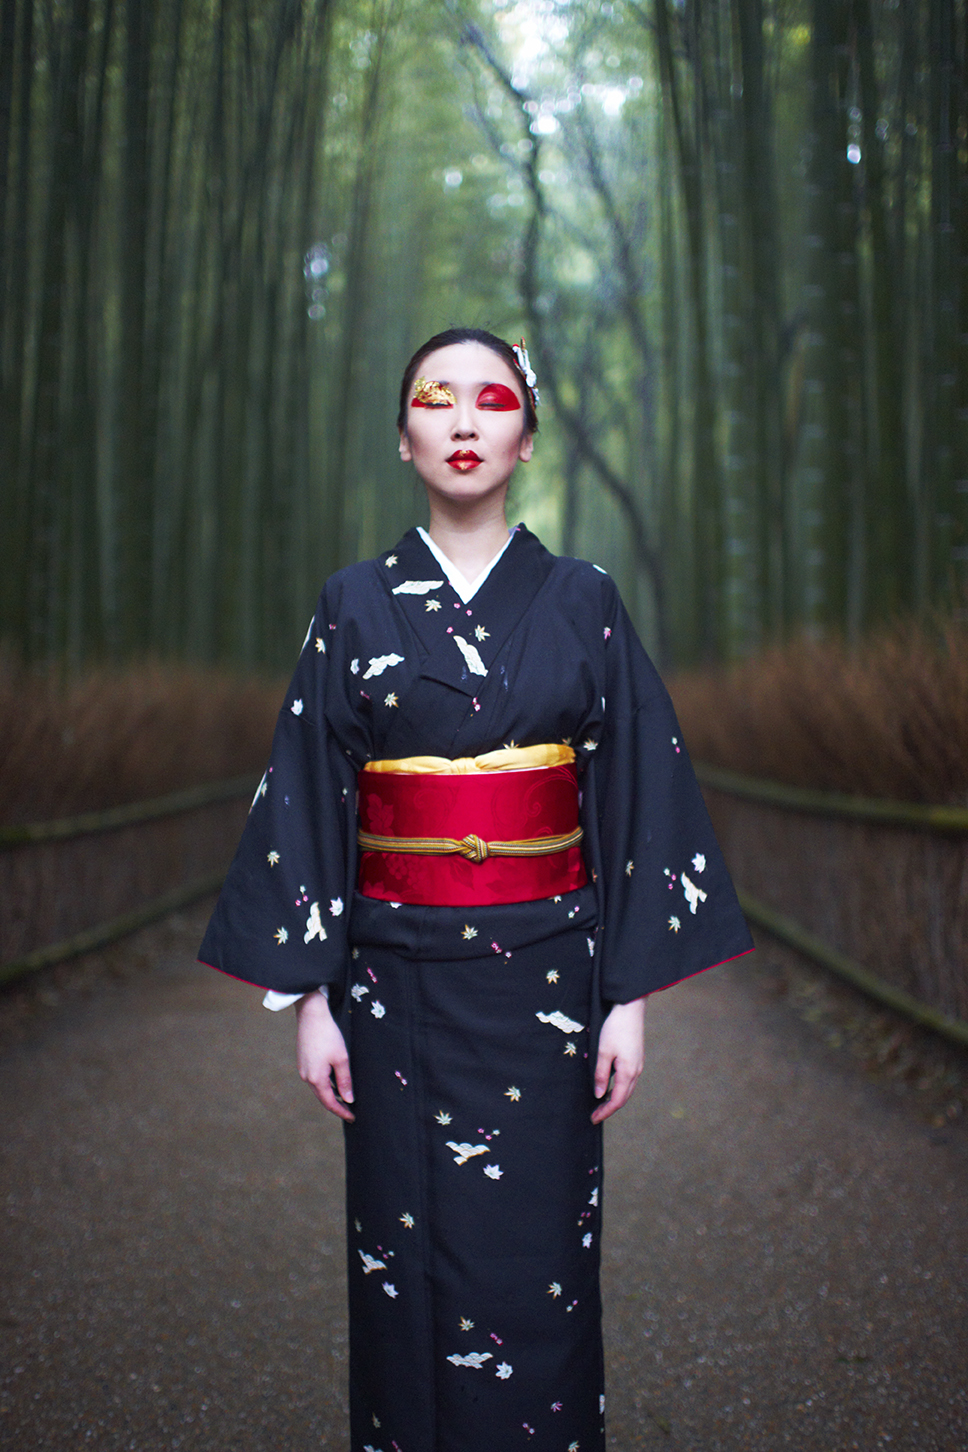
To create amazing pictures, you must think like a movie director because great pictures often tell a story and have a hero. Sometimes the hero is very obvious, like in the image of the Japanese woman in the middle of the bamboo forest. The woman is the hero of the image but the bamboo forest is the supporting cast. In the image of the Washington Monument, the monument is the hero, but the sunrise sets the mood.
Both images were planned. For the model image, I scouted a model from a Japanese agency in Osaka, Japan and had her come to Kyoto, Japan for the shoot. I talked to the makeup artist while I was still in America so we were all clear about the concept before the shoot
. For the image of the monument, I looked up the time for sunrise, went to the location the day before to find my angle and then got up and 4:00 a.m. to take my place and wait for the perfect moment.
Step 6: Image Selection
I rarely hear people talk about how to select your images these days, but it is a very important step for the photographer looking to advance his or her career. You can take a thousand images, but it takes a trained eye to be able to select the perfect shot to show the world. Here's the tricky part. Sometimes the best image to show is not the best image from your shoot. I know, this sounds confusing, but you only want to show images to fit your brand. This took a long time for me to grasp, but it made the most significant difference in my work.
Step 7: Post Production
Another question I am asked all the time is, "do you retouch your own images?" There are a lot of great photographers who love doing their own retouching, but I am not one of them. The less time in front of a computer means the more time I can spend with a camera in my hands. Knowing when to delegate is an important part of making a great image. Like a great director, you need a great team. The best retouchers are those who spend every waking moment retouching. I send my images to a retoucher with instructions on how I'd like to make adjustments and we go back and forth until I have exactly what I want.
Oh, by the way, if you want to really take your photography to the next level, the Master Your Lens digital Course launches today for a limited time. The course is broken down into six lessons and offered one at a time. The first lesson goes on sale today and is only available until August 31st. Orders close at midnight, PST on 8/31/2015.
ORDER TODAY: Master Your Lens: Lesson One
The great things about having the course broken down by lessons, vs committing to the entire course all at once, is that it gives you a chance to try the course out and see if you like it. Each lesson is only $197.00 so the financial commitment is not as difficult as the entire course would be all at once. I believe once you start the journey by taking the first lesson you will want to continue as this course is designed to really give you step-by-step instructions and help in taking your photography to an incredible new place. Lesson one is all about self-discovery!
Always dream big!
Sometimes, the first step is the most difficult one to take when it comes to getting started in photography. Here are seven steps to help guide you through your journey in creating amazing pictures.
Step 1: The Idea
Everything starts with a big idea. As soon as the idea comes write it down right away. Computers and other devices are great, but I prefer putting pen to paper. Maybe I'm old fashion but this seems to work the best for me. Give it a try and see how it works for you. Start with the idea and define it by writing it down.
Step 2: Research
Today, it's easier than ever before to do research. I used to keep countless books of tear sheets from old magazines as research material, but today, we have Pinterest to make our lives easier Use Pinterest to make inspirations boards and do conduct your research. After you write down your idea, dive into research.
Step 3: The Sketch
I'm no Picasso, but I am a visual person. Sketching out my ideas after doing the research has always helped me in visualizing how I will bring my vision to life. In advertising assignments, one of the first things clients send sketches or some type of visual board. The sketch helps you see things in a clear way and visualize the image for the first time in a tangible manner. It also helps me when you need to share your idea with your team. I can share an idea with my team but they may have a different visual in their mind. When I show and tell it helps my team come together as a unit to bring the vision to life.
Step 4: Pre-Production
Pre-production is probably the most important aspects of any photo shoot, and the bigger the shoot, the more important pre-production is. Whenever I mention this in a seminar or workshop someone always says "what is pre-production?" Pre-production is the process of producing your photo shoot or putting the shot together. You have your idea, you've done your research, you have a sketch and now it's time to figure out all the elements come together to make your shoot a success. The big elements are easy to see, but it's the small details that can often become overlooked and make or break a photo shoot. Pre-production is the key to having a fantastic shoot, so make sure you go over every element and mentally walk through the steps to bring your vision to life. The more time you spend producing, the better things will be on your shoot day. If you're shooting a model, what color will her nails be? If you're shooting on a beach, how will you change lenses if it's windy? Try to think of every small detail you can and plan for your success. A key element to always have is a call sheet. No matter how big or small this will keep you from going crazy when you move to the next step.
Step 5: Taking Your Picture
This is the fun part, which is why so many people want to start here, but if you skip the steps before this and jump into taking a picture you will find yourself in the same place year after year. Great pictures are rarely a mistake. Yes, there are those times when something amazing takes place right in front of your camera, but it happens more often to the photographer who is trained to create great images.
To create amazing pictures, you must think like a movie director because great pictures often tell a story and have a hero. Sometimes the hero is very obvious, like in the image of the Japanese woman in the middle of the bamboo forest. The woman is the hero of the image but the bamboo forest is the supporting cast. In the image of the Washington Monument, the monument is the hero, but the sunrise sets the mood.
Both images were planned. For the model image, I scouted a model from a Japanese agency in Osaka, Japan and had her come to Kyoto, Japan for the shoot. I talked to the makeup artist while I was still in America so we were all clear about the concept before the shoot
. For the image of the monument, I looked up the time for sunrise, went to the location the day before to find my angle and then got up and 4:00 a.m. to take my place and wait for the perfect moment.
Step 6: Image Selection
I rarely hear people talk about how to select your images these days, but it is a very important step for the photographer looking to advance his or her career. You can take a thousand images, but it takes a trained eye to be able to select the perfect shot to show the world. Here's the tricky part. Sometimes the best image to show is not the best image from your shoot. I know, this sounds confusing, but you only want to show images to fit your brand. This took a long time for me to grasp, but it made the most significant difference in my work.
Step 7: Post Production
Another question I am asked all the time is, "do you retouch your own images?" There are a lot of great photographers who love doing their own retouching, but I am not one of them. The less time in front of a computer means the more time I can spend with a camera in my hands. Knowing when to delegate is an important part of making a great image. Like a great director, you need a great team. The best retouchers are those who spend every waking moment retouching. I send my images to a retoucher with instructions on how I'd like to make adjustments and we go back and forth until I have exactly what I want.
If you'd like to see how these seven steps relates to a shooting a fashion & beauty story, you can get the FREE VIDEO by clicking the link below. Have fun shooting, and always dream big.
I have always been attracted to opposites. My friends in New York used to say my dating life looked like the United Nations, but that's another story all together.
In photography the opposites rule works to give our images more impact and helps us to create powerful stories that stay with the viewer. Seeing a powerful color image juxtaposed against a black and white image makes both images look stronger than a single image alone.
China 04/2014
There are many variations of the opposites attracts rule, and examples are all around us on billboards, in editorial magazine spreads and advertising campaigns. It doesn't matter if the images are of people, products or locations, the opposites rules works.
Japan 04/2015
To learn more about photography why opposites attract sign up for the one-on-one classes. You can learn photography from anywhere in the world as long as you have a skype or google plus account. The online classes are 8 weeks long and will open your eyes to a new way of seeing the world through photography. No matter where your interest in photography is this course will help you to improve and become a better photography.
Sign up here: One-on-One with Matthew Jordan Smith
Always Dream Big